
July must be my month for learning new tricks in the kitchen. This year, it was waffles. Last year, jam.
I’d put off learning how to make jam for a long time, mostly because it seemed somehow out of reach. Once upon a time, I’d felt that way about bread baking, too, and actually, there may have been something similar going on. Both bread and jam are made from the simplest, sparest ingredients, and I think that’s where the intimidation factor comes in. That flour and water become bread, and fruit and sugar become jam – it’s a lot to get your head around. It seems unlikely, to say the least. Of course, it’s just science, but it feels like magic.
The last week of July happens to be my jam-iversary. It was July 25th, to be exact, when I first jammed: an intended apricot jam to which I added too much lemon zest and left on the heat for too long. No harm done; I called it Apricot Lemon Marmalade and every jar was scraped clean. One trip around the sun later, I’ve done a fair amount of jamming: nectarine jam, multiple batches of Luisa Weiss’s plum butter, then Seville orange marmalade last winter. I told you about the plum butter last fall, but the seasons kept slipping by before I had a chance to tell you about the others. I’m here today because I don’t want that to happen again. So. Apricots, friends. I’ve come full circle. Only this time, my jam is jam. Really good jam, too.
The recipe I used this year comes from The Blue Chair Jam Cookbook by Rachel Saunders. I am so inspired by this book. It’s lived mostly on the table over the last few weeks instead of its usual place on the shelf, and the other day while catching up on the phone with an old friend, I suddenly noticed that I’d been stroking it, like you would a small child, for who knows how long. It’s very beautiful – among the most beautiful books I own – but more than that, it is a brilliant and generous guide. Every time I open it, I learn something: the difference between jams, jellies, and marmalades; how to pick the right fruit for preserving; what the sugar, acid, and pectin, are actually doing there in that pot. There are a ton of recipes, then an entire section – over 50 pages! – about the fruits themselves with physical characteristics, flavor profiles, pectin contents, and best pairings for each fruit. It sounds like a lot of nitty-gritties, a lot of science, maybe too much information to take in.
And that’s what’s remarkable. It doesn’t feel that way at all. There is a lot to take in, but the way Saunders writes, she’s not instructing you as much as she is helping you hone your own instincts about what’s important and what’s not, how jam should look, and feel, and taste when it’s done. I’m grateful for that because, yes, jam making is a science, but it’s also very much an art. There’s an element of feel involved that can try one’s courage. This book makes me braver. Better still, it makes me make amazing jam.
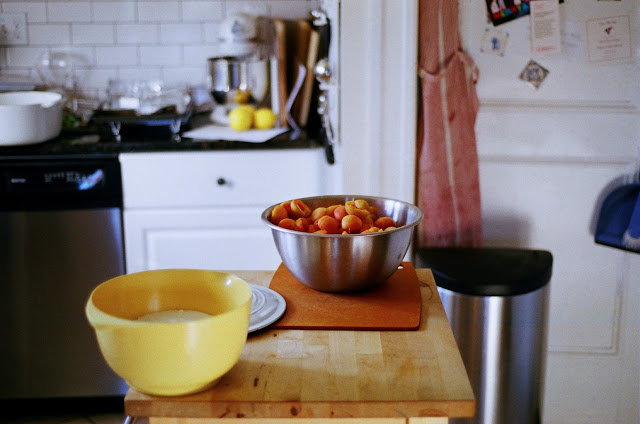
I chose the plainest of the apricot recipes to start, one that’s just apricots, sugar, and lemon juice, infused with apricot kernels. (The kernels, in case you’re new to them, are the nut-like things housed within the apricots’ pits. They look like small, flat almonds, and smell like them, too, and are used to flavor amaretto cookies and liqueur.) This recipe is about apricots being apricots, apricots at their best. Sweet, tart, buttery, bold: I’ve already written multiple times on this site about the glory of apricots plus heat. This jam is that glory in its purest form. In her headnotes, Saunders calls the flavor “sumptuous,” and while I don’t think I’ve ever said that word out loud or in print, I think it’s exactly right.

One other thing I want to mention is Rachel Saunder’s canning technique. In the past, I’ve processed my jars in a giant pot of boiling water on my stovetop. It is my least favorite part of jam making. The pot is heavy; it crowds the stovetop, heats up the kitchen, and I’ve more than once splattered myself with boiling water while maneuvering jars in and out. Saunders has you sterilize and process your jars in a 250-degree oven, instead. The technique is simple: Place your jars and lids on a baking sheet (best to use one with a lip) and put them in the heated oven for at least 30 minutes. When your jam is ready, remove the jars from the oven, and fill. (Test first by pouring a spoonful of jam into one of the jars; if it boils, wait a minute before filling.) Once your jars are ready for processing, put them back into the oven for 15 minutes. That’s it. It’s easy, it’s fast, and I am never going back.
And listen, if you’d rather not process your jars at all, skip it. This recipe yields only five 1-pint jars (that’s 10 cups, total). The jam will keep in your fridge for at least a couple of weeks, so you can hold on to a jar or two for yourself, and give the rest away.
Enjoy this first weekend in August, friends. See you back here, soon.
Apricot Jam
Adapted from The Blue Chair Jam Cookbook by Rachel Saunders
My first batch was with Blenheim apricots, as Saunders recommends, and the results were spectacular. This week, I used some apricots from our local farmers’ market, and while the flavor was different – a little less full, maybe – I was still thrilled with how it came out. The original recipe has you put half of the macerated fruit through a food mill for variation of texture in the finished jam. I skipped that step, but because this is a small batch that cooks quickly, I still had the occasional pleasant lump. Saunders suggests adding a split 1-inch piece of vanilla bean to the apricot kernels for a change. I tried it with my second batch, and honestly, the flavor was so subtle that I could barely detect it. I’ll either skip it the next time around, or try adding more.
Ripe apricots are very easy to prepare. You don’t even need a knife; just pull them apart with your fingers. Please note that the weight of the apricots, below, refers to pitted apricots. Buy an additional pound and a half or two to make sure you’ll have enough.
6 pounds pitted and halved apricots, 10 pits reserved
2½ pounds white can sugar
2½ ounces strained, freshly squeezed lemon juice
Prepare your fruit the night before:
Take two large containers or pots with tight-fitting lids, and fill each one with 3 pounds of apricots, 1¼ pounds of sugar, and 1¼ ounces of lemon juice. Stir well. Press a sheet of plastic wrap directly onto the surface of the mixture, smoothing to minimize air bubbles. (The idea is to keep the fruit from browning as it macerates.) Snap a lid on each pot, and let macerate in the refrigerator overnight.
On jam day:
Place five metal teaspoons on a small plate and put into the freezer. You’ll use the frozen spoons for foolproof jam testing later on.
Heat the oven to 250°F.
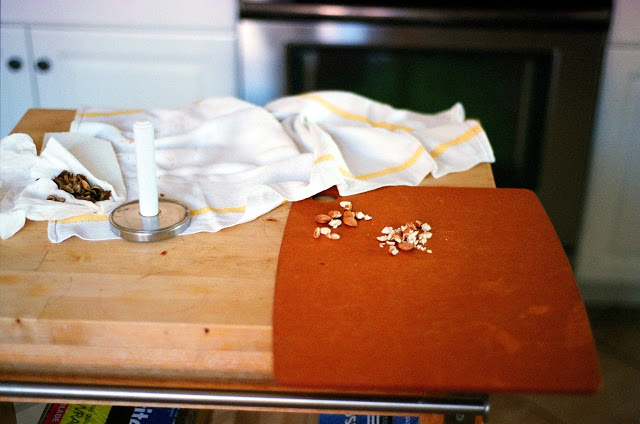
Wrap the apricot pits in a dish towel – an old one is best; it may snag or tear a bit – and tap with a hammer (I used a meat pounder, pictured above) until they crack. Remove the kernel from each pit and discard the shells. Coarsely chop the kernels, and place them in a fine-mesh stainless steel tea infuser with a firm latch. Put the vanilla bean in there, too, if using (see note, above) and set aside.
Transfer both containers of macerating apricots to your preserving pan. (The fruit will have shrunk considerably.) Be sure to scrape in all of the sugar. Submerge the tea infuser in the mixture.
Place five 1-liter jars (or the equivalent) and their lids onto a baking sheet, and put into the oven. Bring the fruit and sugar mixture to a boil over high heat, stirring frequently with a large heatproof rubber spatula. Boil, stirring frequently, for 4 minutes. Remove from the heat, and skim the foam from the top of the mixture with a large stainless steel spoon. Return the jam to a boil, then decrease the heat slightly and cook for 30-40 minutes, until the jam thickens. Scrape the bottom of the pan with your spatula frequently and keep a close eye on the heat. You’ll want to turn the flame down gradually as the moisture cooks out of the jam. When you’re getting close – say, the last 10 to 15 minutes of cooking – slowly stir the jam to keep it from scorching.
Now it’s time to test the jam for doneness: Transfer a glob of jam to one of your frozen teaspoons and put it back in the freezer for 3 to 4 minutes. Feel the underside of the spoon; it should be neither warm nor cold. Tilt the spoon vertically to see how quickly the jam runs. If it runs very slowly and has thickened to a gloppy consistency, it’s done. If it’s still watery, cook for another few minutes, and test again.
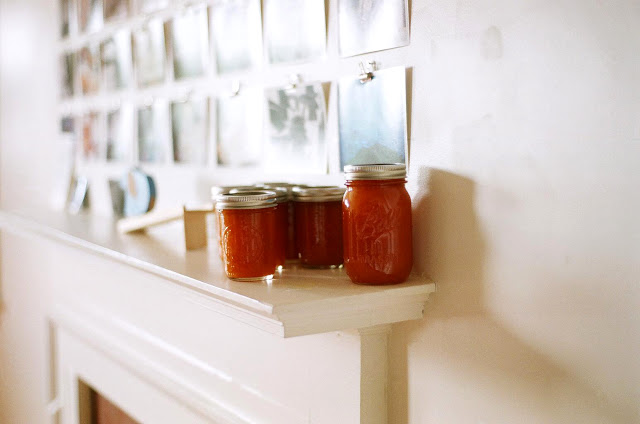
When your jam is done, remove the tea ball, and skim the remaining foam from the surface of the jam. Pour the jam into the sterilized jars, wipe the rims with a damp cloth to remove any spilled jam, cover with the lids, and screw the rings on just until they are snug. Put the filled jars back in the oven for 15 minutes, then place them 1-inch apart on a drying rack to set overnight at room temperature. They will seal as they cool. (If you have any that don’t, store in the refrigerator and eat within a few weeks.)
Yield: 5 1-pint jars